
Repurpose Content Get More Eyeballs On Your Offers!
Repurposing content is an easily implemented tactic to getting more eyeballs on an article or blog post. Repurposing content also means you provide multiple mediums for visitors and followers to embrace your content.
In this tutorial I will demonstrate how I take a blog post and convert it into a PDF and a video.
As you review this how to repurpose content tutorial, keep in mind that this is how I do it. There are many ways to get the same result. At this point and time, this is what works for me.

For this tutorial, I’m make an assumption that you know how to create a blog post. For demonstration purposes, I’m using this post that you are reading.
By the way, I use software to find the best title for my blog posts. There are both free and paid tools that can do that for you. I recommend Title Analyzer not only because it is effective and includes Fresh Title but because it blends with other tools I use like Keyword Atlas.
Keyword Atlas is an awesome tool for finding and developing a blog series based on keywords that are trending today. It is easy to use and is supported with loads of tutorials.

Regarding Title Analyzer, in creating this post I originally started with this title, “Get More Eyeballs On Your Content Easy Multi-Purpose Tips”. However, after entering that into Title Analyzer and trying several variations, I arrived at the title “Content Distribution Easy As One Two Three”. In the graphic you see it scored 75.49 which is pretty good for SEO.
I use Microsoft Word for preparing my posts. The reason I use Word is the number of features it has. Not just the usual spell check and formatting, but tools like being able to highlight a word or phrase and have a reference content pop-up or perhaps synonyms when I want a better descriptor.
Word also checks my grammar, allows me to add graphics or images and much more.
More importantly, once I am happy with the post, Word allows me to easily save the document as a PDF.
Before saving and posting the article, while I am still in Word, I add a cover page, table of contents, header, and footer. I then save the Word document as a PDF.
Next, I upload the PDF to eJunkie so readers can easily download it.
There are many places where you can save your PDF documents for easy download by your readers. For me, eJunkie works just fine.
Why eJunkie?
eJunkie is inexpensive, is able to capture all the information I want and more when someone downloads one of my files, eBooks, or takes out a membership.
Additionally eJunkie allows you to not only set-up a store front with full-service payment options, but you can also create your own affiliate program and have others sell your products for you.
eJunkie easily integrates with payment processors like PayPal for subscriptions and membership sites.
For demo purposes, click here to see the download page for this document.
As a quick review, at this point my article is already posted and there is a link to download a complimentary copy in PDF format.
You might be wondering why I uploaded the PDF and have the blog post live and am just now starting to create the video?
The answer is time.
Posting the blog and setting up the article for PDF download go hand in hand. They can be done almost simultaneously. Creating the video for a blog post is a little more time consuming. So it is better to have the post working for you as you prepare the video.
Note that the type of video I am referencing is not the same as simply pulling out your mobile device and creating a spontaneous talking video. Nor is it like doing a live review of a product or project where the camera is on and you are talking – possibly scripted or maybe off the cuff.
To create a video of a blog post or article, I use Microsoft Power Point.
Yes, there are other tools you can use. But again, this is how I currently create a video from a blog post.
Next Open Slide Show Presentation …
In creating the Power Point presentation, for consistency I attempt to use the same images as used in the blog post or article. This is not only more efficient but keeps the content in sync when readers go between both the PDF, Blog, and video.
Once I have the Power Point presentation completed, I open the slide show.

When the slide show screen opens, on the left (#1) is the first image that will be seen by the audience.
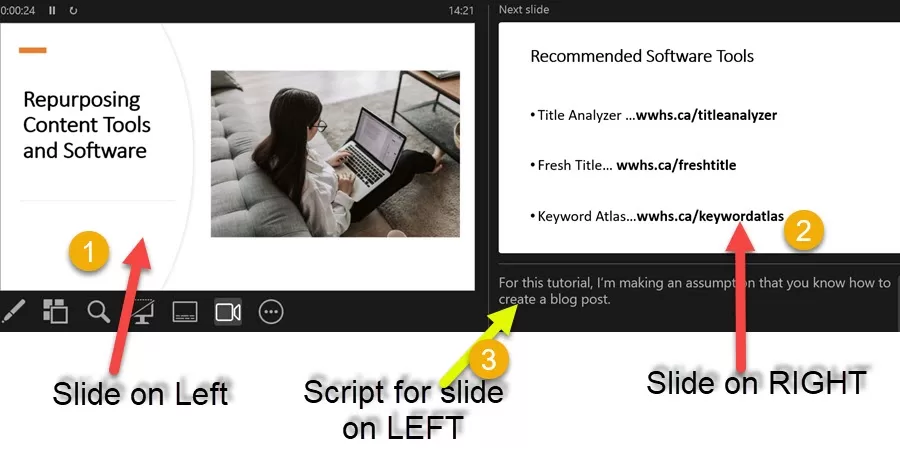
In the right Power Point frame (#2) is an image of the slide that will open next.
Below it (#3) is the script related to the slide that is in the left screen (#1). So this script is what you should be recording.
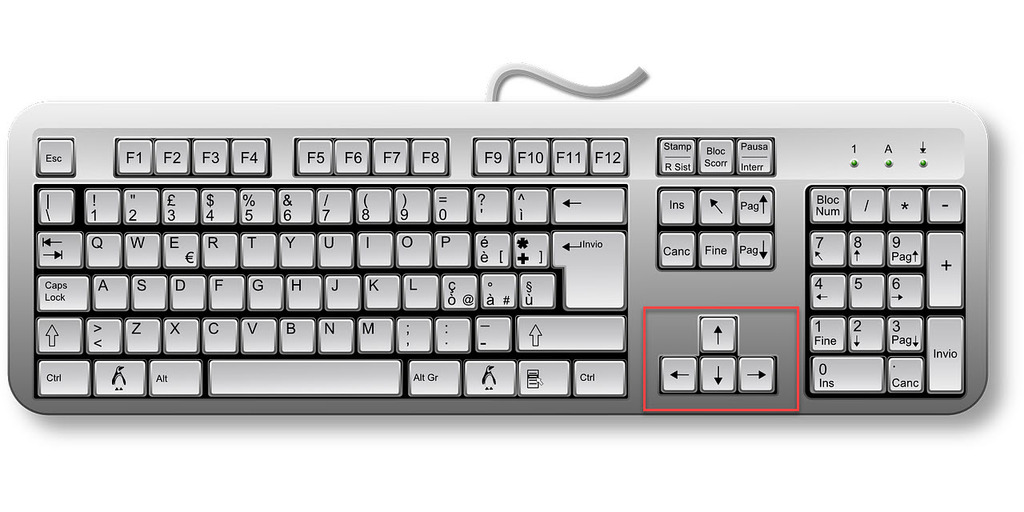
Although I do have a remote device to transition from one slide to the next, I prefer to use the right and left arrow keys on my keyboard.
That’s it. These are the steps I currently follow for content distribution and to grab more eyeballs.
Repurposing content truly is easy as one, two, three. It just takes a little practice and patience.
That’s it. These are the steps I currently follow for content distribution and to grab more eyeballs.
Repurposing content truly is easy as one, two, three. It just takes a little practice and patience.
Big note … just be yourself. Whether you include you framed in a corner of the video or not, you do not have to have the voice of a professional nor do you need an acting skills. The best learning comes from people like you and me who are in the trenches doing exactly what we are providing information on.
The only guideline I insist on with my students and clients is no false information or promises. What you say, what you share, what you recommend must be accurate.

Big note … just be yourself. Whether you include you framed in a corner of the video or not, you do not have to have the voice of a professional nor do you need acting skills. The best learning comes from people like you and me who are in
the trenches doing exactly what we are providing information on.
The only guideline I insist on with my students and clients is no false information or promises. What you say, what you share, what you recommend must be accurate.
Recommended ….
Tools
Title Analyzer (includes Fresh Title)
Affiliate Marketing